Pylon Assembly

Pylon Assembly

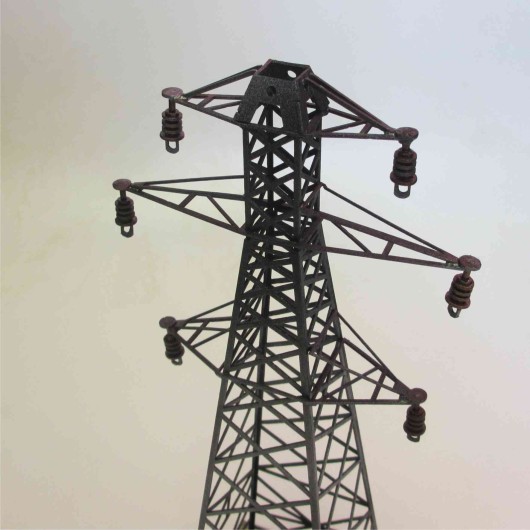
Our pylon kit is a multi-part laser-cut kit in marine-grade plywood and dowel. Designed to be easily assembled and fixed with thin superglue for a 280mm tall (15m at 1/55 scale) scenic element suited for any number of post-war and near future wargame settings.

Tutorial Steps

  • step
    1
    Pylon Assembly

    Check all parts are complete - 3 sheets of 0.8mm thick ply and 1 piece cut from 3mm thick material.

  • step
    2
    Pylon Assembly

    Cut parts from sheet as needed with a sharp craft knife where tabs are partially removed.

  • step
    3
    Pylon Assembly

    File or sand any remaining excess tag to leave flush surfaces.

  • step
    4
    Pylon Assembly

    Begin assembly with four main lattice structures. Note that there are two types - 1 pair with support tags approx. 3/4 from the base, and 1 thinner pair. These are designed to sit opposite one another. Select one of each pair, dry assemble at right angles and apply superglue. We recommend Zap Superthin for ease & speed of assembly.

  • step
    5
    Pylon Assembly

    Use liquid cyano accelerator, applied with a dropper, to speed up setting. Superthin zap glue runs along fine joints with capillary action and requires far less glue than thicker adhesives.

  • step
    6
    Pylon Assembly

    Use a small engineer's square or block as required to help keep lattice sitting true during assembly.

  • step
    7
    Pylon Assembly

    With first two sides assembled, take 3rd lattice and fix into place opposite its twin (ie. so that support tags are opposite one another).

  • step
    8
    Pylon Assembly

    Fit fourth, final side of the main lattice following previous steps. Glue bottom corner first.

  • step
    9
    Pylon Assembly

    Move to upper corner, dry fit square with the other pieces, and apply glue from top corner.

  • step
    10
    Pylon Assembly

    Ensure all four sides are glued securely, apply additional superthin zap as required.

  • step
    11
    Pylon Assembly

    Dry fit footplates to each corner of the lattice. Do not glue at this stage UNLESS you are planning not to use the supplied baseplate.

  • step
    12
    Pylon Assembly

    With all four feet in place, fit tower to base plate, ensuring central positioning, and glue into position. Tower can be assembled without the baseplate, but it will be far stronger when fixed in place.

  • step
    13
    Pylon Assembly

    Cut largest crosspiece from sheet and drop into place. It should sit onto the four support tags at approx. 3/4 height.

  • step
    14
    Pylon Assembly

    Apply a drop of glue at each corner junction to fix first crosspiece in place.

  • step
    15
    Pylon Assembly

    Assemble upper lattice following the same procedure as the main legs, again, keeping pairs opposite one another.

  • step
    16
    Pylon Assembly

    With all four pieces assembled, check for square and fit - sides with additional crosspiece should face in the same direction as the crosspiece arms.

  • step
    17
    Pylon Assembly

    Dry fit upper lattice, making sure of fit and alignment before fitting second crosspiece. Note that rounded tags are uppermost, squared tags fit into notches at the top of the main leg structure.

  • step
    18
    Pylon Assembly

    Dry fit second (longest) crosspiece.

  • step
    19
    Pylon Assembly

    With crosspiece in place, fit and cement upper lattice in place.

  • step
    20
    Pylon Assembly

    Fit and glue top crosspiece into place.

  • step
    21
    Pylon Assembly

    Assemble and glue crown lattice pyramid following previous procedure. Again, keep matching pairs opposite.

  • step
    22
    Pylon Assembly

    Fit and glue pyramid crown into position. Ensure sides with crossbar face in the same direction as the crosspiece.

  • step
    23
    Pylon Assembly

    Take supplied dowels (standard toothpicks are the same diameter if you need more) and cut ends square using a craft knife held perpendicular and at right angles to the grain. Cut with a rolling pressure rather than attempting a straight cut.

  • step
    24
    Pylon Assembly

    Cut 6 x 15mm lengths of dowel for insulator coil cores.

  • step
    25
    Pylon Assembly

    Fit slotted disc to one end of a dowel. Do not glue until next stage.

  • step
    26
    Pylon Assembly

    Fit tabs of cable holder into slot, apply glue to whole assembly and set aside to dry. Assemble 6 of these (there are spares on the sheet in case of breakage or mistakes).

  • step
    27
    Pylon Assembly

    Each coil has 7 ring elements, alternating small and large.

  • step
    28
    Pylon Assembly

    Slide rings in turn onto dowel. These are a snug fit intentionally to maintain the overall shape of the finished coil.

  • step
    29
    Pylon Assembly

    One assembled coil with alternating rings. Apply a small amount of glue at the top of the coil and allow to penetrate by capillary action. Set aside and complete all six.

  • step
    30
    Pylon Assembly

    Dry fit coils into holes at the ends of the crosspieces, leaving approx 1-1.5mm standing proud.

  • step
    31
    Pylon Assembly

    Fit remaining large disc over protruding dowel, ensure cable holder is aligned at right angles to the tower, and glue into place. Repeat for all 6 coils.

  • step
    32
    Pylon Assembly

    Fit support bars to crosspieces - one different sized pair per crosspiece. Glue into position.

  • step
    33
    Pylon Assembly

    Allow kit to dry thoroughly, then prime and paint as normal. Ours was spray-painted in less than five minutes using Halfords car paints (black primer followed by gunmetal silver in patches) with Army Painter washes applied to the coils once the spray paint was dry. Base was wet-brushed with lighter colours and then flock and static grass tufts were applied. Total assembly time including painting - approximately half an hour.